I want to replace the current TDrawable image with the Viewport but the picture does not fill the entire Viewport.
The background picture is 2K (2560 x 1440) but when I load I get this:
Update:
MainViewport.FullSize := true; now does fill up the screen but the image is still smaller and centered.
The image has to fill up the whole viewport.
I see you found one answer – to make the viewport fill the window, you just use MainViewport.FullSize := true;. The values of MainViewport.Left / Bottom / Width / Height do not matter then.
Image loaded to a Scene is automatically a rectangle with size equal to the, well, actual image in pixels. So it is 2560 x 1440.
And the viewport has a concept of “how wide area to display”. This is the projection. In case of 2D game, you want orthographic projection (set by MainViewport.Setup2D) and to make the westbeach.png image always fill the viewport, you want “how wide area to display” to just be equal to your westbeach.png image size.
Doing it like this has a few advantages. E.g.
you will be able to move and resize around the game area (viewport), and the game will still fit within viewport nicely. You can test it by reverting back to MainViewport.FullSize := false, and resizing viewport (e.g. in editor). This is useful in case you may, at some point, decide to add e.g. a sidebar on the left/right of the viewport.
it will now work with any window size. It doesn’t matter if the window is 2560 x 1440 or not. Viewport fills the entire window (thanks to FullSize = true), but the “area that is displayed within viewport” is always 2560 x 1440.
actually it is a bit more complicated in case your aspect ratio is different than 2560 : 1440. We will then automatically adjust the visible area size. Just experiment by resizing the whole game window and see how viewport with image adjusts.
Note: you and I are showing examples using Pascal code. But these things can be done visually by just using CGE editor ( Editor | Manual | Castle Game Engine ), and I definitely recommend using it. It will make experimenting with all these things easier. All these components and properties are visible and can be changed in the editor visually.
  { We always want to see full height of background.x3dv,
    we know it starts from bottom = 0.
    BoudingBox.Data[1][1] is the maximum Y value, i.e. our height.
    So projection height should adjust to background.x3dv height. }
  Viewport.Camera.Orthographic.Height := Background.BoundingBox.Data[1][1];
Note that you can also use search in our API docs: Search Results .
Indeed. Another way of doing it would be leave Scene.Translation at default (zero), so that image image center is at zero, and adjust MainViewport.Camera.Orthographic.Origin := Vector(0.5, 0.5). This would mean that camera position (0,0) (the default) determines what is visible in the middle of the viewport (by default it determines what is visible in left-bottom corner). See https://castle-engine.io/apidoc-unstable/html/CastleCameras.TCastleOrthographic.html#Origin .
Both ways make sense, it depends on what is your preferred coordinate space to position the rest of the world, and how do you want the viewport and window to behave when it is resized (and aspect ratio may not correspond to 2560 : 1440). With MainViewport.Camera.Orthographic.Origin := Vector(0.5, 0.5), the world center (0, 0, 0) is “glued” to the center of the viewport. With MainViewport.Camera.Orthographic.Origin := Vector(0, 0) (default), the world center (0, 0, 0) is “glued” to the left-bottom corner of the viewport.
Ups – I made similar mistake as before. Should be MainViewport.Camera.Orthographic.Origin. I’ll also edit my above post.
Note that value (0,0) is default value of Origin. Value (0.5,0.5) of Origin means that the middle of the viewport looks at the point (0,0,0) in your world, where the middle of the image lies.
Ok, I found out that
MainViewport.Camera.Orthographic.Origin := Vector2(0.5, 0.5); gives the same result as
Scene.Translation := Vector3(1280, 720, 0);
MainViewport.Camera.Orthographic.Origin := Vector2(0, 0) just shows top right part of the image that I uploaded before.
Still confusing but Mathematics was never my thing at school.
Part 2:
Converting a sprite screen to X3D and loading / displaying it in the viewport.
Problem 1:
I cannot find the “sprite-sheet-to-x3d utility” anymore. Documentation says it is in the Tools map.
I remember it was but not with the newest CGE . Is it removed? It is not in the Alpha 7 release as far as I can see.
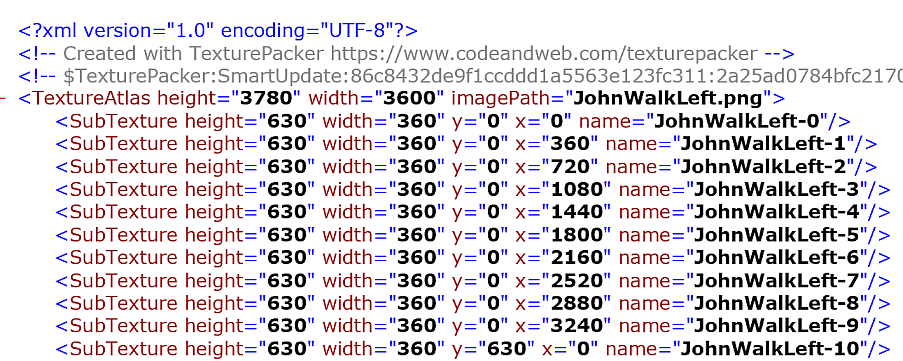
My sprite sheets are .png files with 60 images, 10 columns, 6 rows.
I read the link mentioned. What I don’t understand is how I can make or convert them to starling.xml files so I can load and play them with TCastle.Scene.
There’re many tools that allow you to edit sprite sheet using your images and export to starling and/or cocos2d format, like ShoeBox or TexturePacker. Edit: So in the end you will have 2 files:
PNG file, which contain all of your sprites pack in a single image file.
Starling / Cocos2D file. This file contains necessary information to tell the engine how to slice your image into multiple frames, and which frame belong to which animation.
Many thanks for your information.
I have laid my eyes on TexturePacker and now experimenting with it.
Ok, now things are getting serious.
I have created a sprite screen and the xml.
When I try to load the xml I get an errot it cannot be found.
(I renamed .xml to starling-xml and also tried starling-xml.xml).
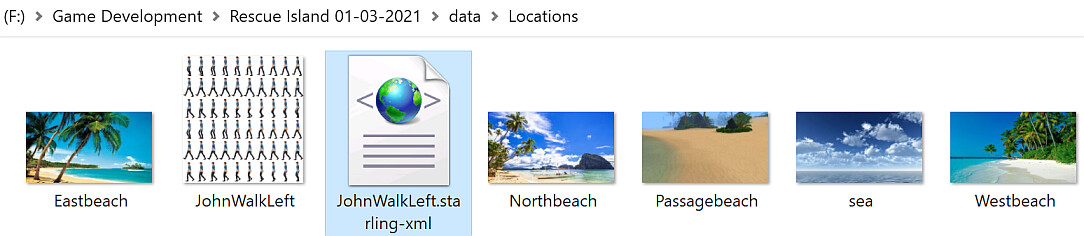
It is in the same directory as the .png.
Then I tried to load the .png instead; it does but I get no picture on screen.
And what is the correct filename for playing/animating the .png spritescreen with Playanimation?
I get no warning, even when I enter a non existing file.
Only the background picture (westbeach) is showing up.
If you load .png into a scene, then you just create a rectangle to display an image (without any sprite sheet logic or animations), as documented on Images · castle-engine/castle-engine Wiki · GitHub . The JohnWalkLeft.png is most probably visible – but at some place you don’t see, or maybe it is obscured by westbeach.png.
As I mentioned above, I really really advise using CGE editor to set these things visually. You will see what is going on visually, and some answers will be obvious.
To load a sprite sheet, you instead want to load the .starling-xml .
In your code, it looks like you just have an excessive space inside this line.
When doing this, still make sure that AnimScene is not obscured by other scenes. Adjust the AnimScene.Translation := Vector3(x, y, z) as necessary. The Z is important for the order in Z (what is in front / behind). If you use blending, also make sure to call Viewport.Items.SortBackToFront2D after adding new item. (see Blending · castle-engine/castle-engine Wiki · GitHub for the reason.)
I very very advise doing it in CGE editor, you can then add scene, change translation and see the result immediately. And the Viewport.Items.SortBackToFront2D is done by a menu item.
Also note that it doesn’t make any sense adjusting MainViewport.Items.MainScene many times. I am not sure whether you need to set MainViewport.Items.MainScene at all (it is often not necessary for world with multiple scenes, you can leave it nil; see MainScene API docs to know when you may need it, Castle Game Engine: CastleScene: Class TCastleRootTransform ). You may also not need to use MainViewport.AutoCamera := true (it means the default camera position will be adjusted to see the whole scene; but it is often more reliable to just set default camera manually, e.g. using CGE editor).
As @kagamma mentions, you don’t need anymore “sprite-sheet-to-x3d”. You just load a sprite sheet using MyScene.Load(...). The conversion to X3D nodes happens under the hood, you don’t have to know about it in usual cases. If any documentation still talks about sprite-sheet-to-x3d, let me know – we want to fix it.
( If anyone really would like to explicitly convert sprite sheets to X3D, you can do it now using view3dsene “Save As…” menu item, or tovrmlx3d, from view3dscene | Castle Game Engine . But it has not much point, for normal sprite sheet usage in CGE. )
Thanks.
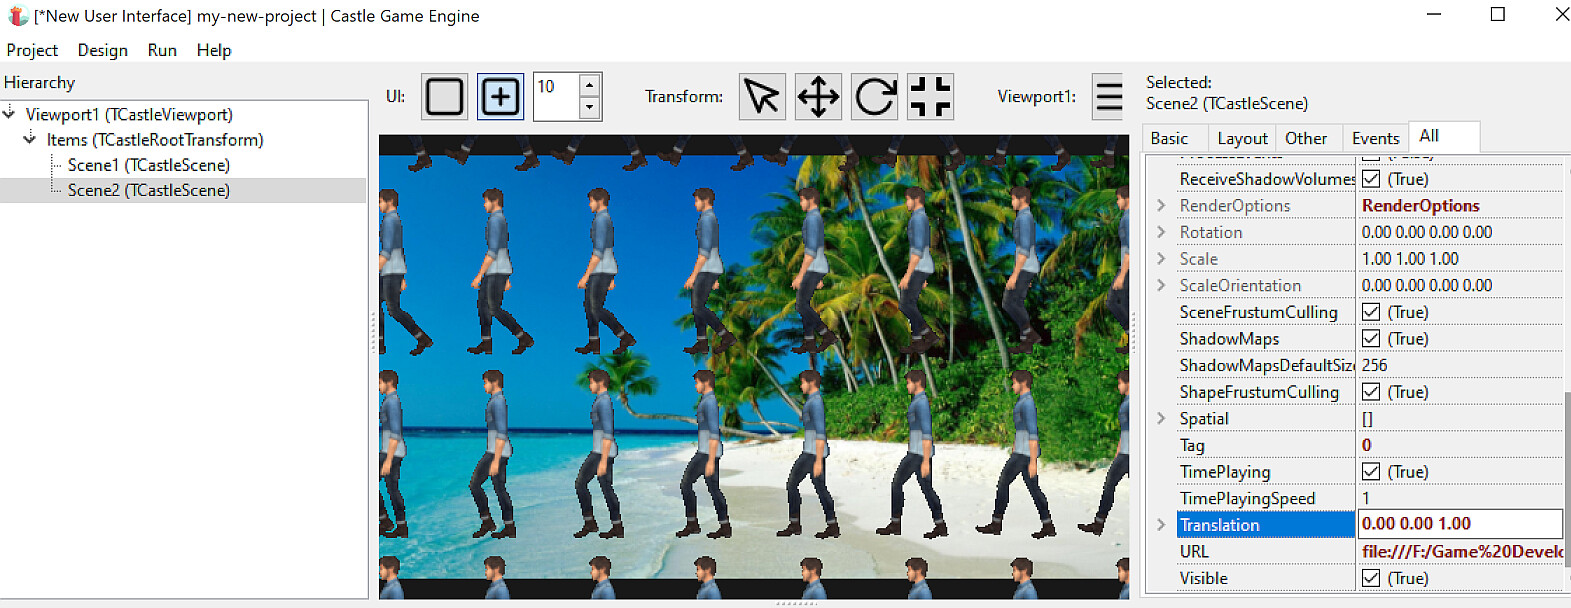
Okay, I am trying the editor but if I don’t know what to select to get things right it is still difficult.
AnimScene.Translation := Vector3(x, y, z) did the thing. It now shows the sprite screen.
But as for xml:
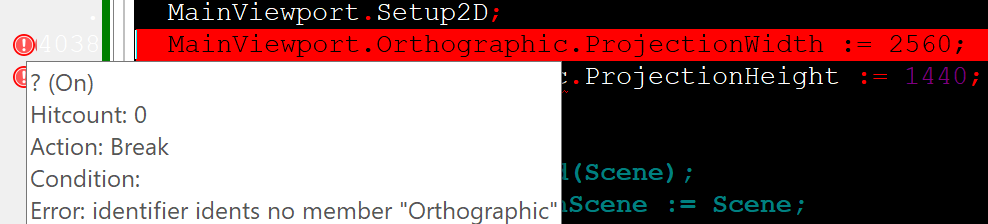
AnimScene.Load(‘castle-data:/locations/JohnWalkLeft.starling-xml#fps:45’); still gives “file not found” error. I cannot see what is wrong here.