Convenient way to determine exact point under mouse

I am trying to find the best way to determine the exact point coordinates under mouse cursor in 3D world. My current solution was the following.

I created a new function TCastleViewport.HitUnderMouse based on TCastleViewport.TransformUnderMouse to return not just the transform but the whole PRayCollisionNode (defined the new pointer type to be able to return nil) containing also hit point coordinates:

function TCastleViewport.HitUnderMouse: PRayCollisionNode;
var
  I: Integer;
begin
  if MouseRayHit <> nil then
    for I := 0 to MouseRayHit.Count - 1 do
    begin
      if not (csTransient in MouseRayHit[I].Item.ComponentStyle) then
      begin
        New(Result);
        Result^ := MouseRayHit[I];
        Exit;
      end;
    end;

  // Return nil if all items on MouseRayHit list are csTransient, or MouseRayHit = nil
  Result := nil;
end;

To test it I modified the detect_scene_hit demo Update method and it seems to work OK:

procedure TViewMain.Update(const SecondsPassed: Single; var HandleInput: Boolean);
var
  SceneName: String;
  Hit: PRayCollisionNode;
begin
  inherited;
  { This virtual method is executed every frame (many times per second). }
  LabelFps.Caption := 'FPS: ' + Container.Fps.ToString;
  Hit := MainViewport.HitUnderMouse;
  if Hit <> nil then
  begin
    SceneName := Hit^.Item.Name + ', ' + Hit^.Point.ToString;
    Dispose(Hit);
  end
  else
    SceneName := 'none';
  LabelSceneUnderMouse.Caption := 'Scene Under Mouse/Touch Position: ' + SceneName;
end;

My question is that is there a better way to do this or maybe could this new function (or similar functionality) be added to CastleViewport unit for all projects to be able to use it?
That’s a good use-case and completely valid usage of MouseRayHit.

Indeed we may consider adding such thing to CGE TCastleViewport. I wanted to see how people will use it, so for now I exposed:

  • super-simple TransformUnderMouse
  • full-featured but also complicated to use MouseRayHit

Your method HitUnderMouse is something in-between, nice :slight_smile:

Note:

  • I would advise to iterate over MouseRayHit in downto fashion, this way you first check the deepest node in the TCastleTransform hierarchy. (Edit: This was a mistake on my side, actually you should iterate upward, “to”, to first check the deepest node.)

  • It’s a matter of style, but I would probably not bother using a pointer allocated with “New”. I would instead return a Boolean, and have a “out Hit: TRayCollisionNode” parameter. That’s a bit easier to use (a bit like TDictionary<>.TryGetValue), so:

function TCastleViewport.HitUnderMouse(out Hit: TRayCollisionNode): Boolean;
var
  I: Integer;
begin
  if MouseRayHit <> nil then
    for I := 0 to MouseRayHit.Count - 1 do
    begin
      if not (csTransient in MouseRayHit[I].Item.ComponentStyle) then      
      begin
        Hit := MouseRayHit[I];
        Exit(true);
      end;
    end;

  // Return false if all items on MouseRayHit list are csTransient, or MouseRayHit = nil
  Result := false;
end;
1 Like

@michalis Is it also possible with TransformUnderMouse to detect if part of the underlying transform part is transparant? So that it only reacts if mouse is moving over a part that is not transparant?

It is possible. Albeit we would employ some assumptions/epsilons but yes, you can do this. It means you need to query for collision repeatedly – because the collision routines consider the geometry (ignoring whether the texture at them is transparent or not). So you need to make a collision query, then look if you hit a transparent pixel on a texture, and if yes – make a new collision query from a new origin.

To do this:

  • You need to use a more general method MyViewport.CameraRayCollision(RayOrigin, RayDirection) . It returns TRayCollision, just like MouseRayHit (so it can be processed in the same way as above to detect the particular point). It takes as input ray position and direction.

  • Use it in a loop.

    • The initial RayOrigin, RayDirection can come from the mouse position – use MyViewport.PositionToRay.

    • Make a call to MyViewport.CameraRayCollision(RayOrigin, RayDirection). If something was hit, but the texture pixel at the hit point is transparent, make another call to MyViewport.CameraRayCollision(NewRayOrigin, RayDirection). The NewRayOrigin should be “HitPosition + RayDirection.AdjustToLength(SomeEpsilon)”.

    • The remaining task is to query the texture pixel at the hit point. To do this, note that TRayCollisionNode has a reference to Triangle . Use TTriangle.ITexCoord to get texture coordinate at the hit point, and finally use this texture coordinate to query the texture image (e.g. from TImageTextureNode.TextureImage). If the queried pixel has alpha < 0.5, you can consider it transparent, and thus repeat the call.

@michalis Thanks, looks difficult though.
I only use png images as scenes that always have transparant color black around them (RGB 0,0,0).
So the TransformUnderMouse should only give result if the underlying color is not RGB 0,0,0.
Do you have an example how to do this?

Good day! There is a addition to question about detection of transparent objects…
Sometimes i don’t need to detect some specific TCastleTransforn in the current scene. And I use parameter Exists := False to him.
This code run around all items in scene and hide "empty"cells in scene. There is a simple way, maybe it will work in Carring;s case.

for i := 0 to SectorsCount - 1 do
  for j := 0 to SectorDeep - 1 do
  begin
    GridOfEssences[i][j].Exists := False;
    case GlobalMap[Point.WorldPosition.Z, Point.WorldPosition.Y,
      Point.WorldPosition.X].RegionObjects[i][j].EssenceID of
      1: begin
          GridOfEssences[i][j].Exists := True;
          GridOfEssences[i][j].Url := 'castle-data:/Objects/Tree_01.png';
        end;
      11: begin
          GridOfEssences[i][j].Exists := True;
          GridOfEssences[i][j].Url :=
                                  'castle-data:/Objects/Building_01.png';
        end;
    end;
  end;  

And question for all - is this solution is sane?

We don’t really need to look at RGB, if the alpha already indicates that it is transparent. There is no difficulty is reading the alpha channel and testing that :slight_smile:

I’ll try to prepare a sample implementation of what I described, i.e. testing ray collision that avoids transparent objects (feel free to ping me if I forget, or even better: add this to Issues · castle-engine/castle-engine · GitHub so that I don’t forget :slight_smile: ).

Toggling Exists is very cheap, I made sure of it – it literally just toggles a boolean field. So toggling Exists “on and off” around some collision query is completely sane. We even have code in engine e.g. to query what does a creature “see” (is the enemy in line of sight of the creature) that effectively does this:

Creature.Exists := false;
try
  // do raycast from Creature eye, thanks to above we know we'll not collide with ourselves
finally 
  Creature.Exists := true;
end;

So toggling Exists on and off is really instant, no need to worry :slight_smile:

That said, changing scene Url is not cheap. It will load the scene (even if it’s in cache, it will have to instantiate scene nodes). So you should not do something that potentially changes Url of a scene e.g. every frame.

Unless of course in practice these URLs always stay the same as previously, then setting them to the same value is harmless and ignored.

A working example of how to avoid/ignore hitting detection of the transparant color of a scene would be great. Another thing I would like is that all colors of the png image light up a bit when moving the mouse over it, except the transparant color.

To “light up” colors you can use shader effect, like on examples/viewport_and_scenes/shader_effects/ . This shows how to add an effect changing color (using really any function) on a TCastleScene.

( If you put PNG in a TCastleImageTransform, access the internal scene using MyImageScene := MyImageTransform.Lis[0] as TCastleScene. )

This will be even simpler once we implement our new material components, one of them will allow to add shader effects to various components, and also test in CGE editor, see Roadmap | Manual | Castle Game Engine .

Thanks. So, if I need to change picture in TCastleTransform sometimes, can I load to memory all images after start game. And, after that, do aproximally this:
Current_Object-TCastleTransform := Preloaded_Image-TCastleTransform;
Is it faster then change URL?

At now it works like this:

  1. Player change location, for example, he came to the town from the forest.
  2. Next all TCastleTransform objects get them new files (.png or 3D in the future, maybe…), location refreshed like scene in the theater, but with new decorations (for now it happen literally in one moment, but I don’t use many different objects to render yet).
  3. And, after scene constructed, when player interact with this area, all TCastleTransform remain unchanged until player change global location again. In my plan, player will didn’t change location every few seconds, but will explore every scene some time. So, I can afford short loading of scene, i think (if it will be necessary)…

If the scene URLs only change when switching locations, then it’s likely not an issue.

And the images have a cache anyway. So the cost of changing URL, if the same image is loaded elsewhere already, is small. And you can “warmup” cache with your predicted scene contents using Customize look by CastleSettings.xml | Manual | Castle Game Engine .

So you probably don’t need to do anything :slight_smile: based on what you describe.

Though to make things ultra-fast (to have really zero cost of switching)… you can reuse the same image reference multiple times (following " 10. Multiple instances of the same scene" on Writing code to modify scenes and transformations | Manual | Castle Game Engine ). So you could do something like this at initialization:

MyImage[1] := TCastleImageTransform.Create(...);
MyImage[1].Url := 'castle-data:/1.png';

MyImage[2] := TCastleImageTransform.Create(...);
MyImage[2].Url := 'castle-data:/2.png';

....

And then reuse the MyImage[...] instances for tiles:

for X := 0 to ...
  for Y := 0 to ...
    NewTileImage := MyImage[TileType[X, Y]];
    if (TileTransformation[X, Y].Count = 0) or 
       (TileTransformation[X, Y][0] <> NewTileImage) then
    begin
      TileTransformation[X, Y].Clear;
      TileTransformation[X, Y].Add(NewTileImage);
    end;
1 Like

I just tried this example and for testing I replaced the left url knight.gltf with a starling xml pointing to a png but it is not shown, only the position arrows?

I’d have to see what exactly you did to help :slight_smile: Can you send the testcase?

Here it is.
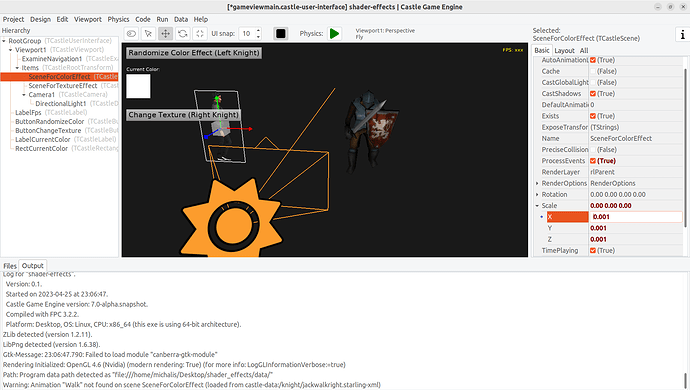
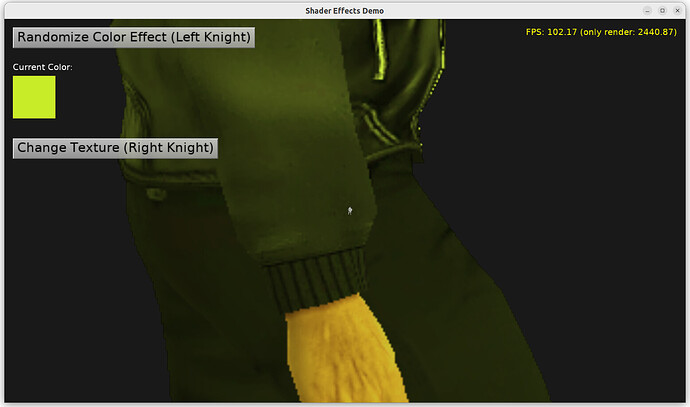
So I replaced the left knight with a starling file. It looks as if the png file occupies the whole viewport now but is not visible.

shader_effects.zip (63.4 MB)

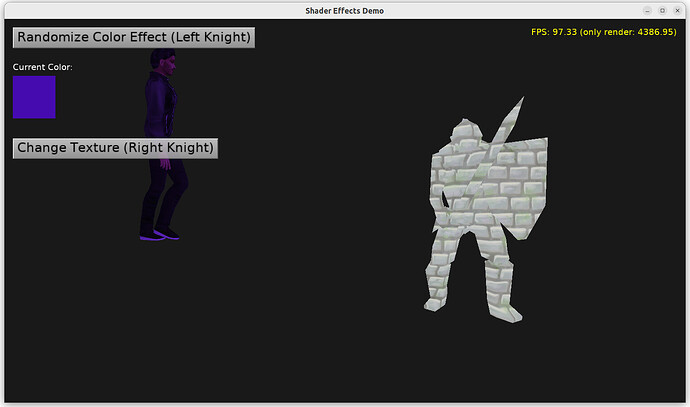
Ir works OK, clicking on “Randomize Color Effect (Left Knight)” works exactly as it should for me.

You don’t initially see the sprite sheet, because it is big, and you really see just one big dark pixel of it. The sprite sheet default size is quite big, which usually makes sense in 2D. In 3D you either want to move camera away from it, or make image smaller.

  • So simply move away from it. At runtime, just use mouse scroll wheel to move away (there’s an “Examine” navigation component in that example, which makes mouse wheel do that).

  • Or adjust Scale on image to e.g. 0.001, to bring your sprite sheet to a size that is similar to 3D knight.

I played with both options to confirm they are fine. “Randomize Color Effect (Left Knight)” works OK either way.


Thanks, got it working now. :grinning:
Using this example and changing color when transform is under mouse (instead button clicking), how can I reset the colors to the original sprite colors of the image when the mouse is not over the image anymore?

In this simple case, just send color to white (RGB 1,1,1), so

EffectColorField.Send(WhiteRGB);
// equivalent: EffectColorField.Send(Vector3(1, 1, 1));

The shader will keep running but essentially doing nothing. This is such a simple operation that it should be OK :slight_smile:

Alternatively you could set Enabled to true or false on the TEffectNode instance. It is created in CreateColorEffect(const Scene: TCastleScene);, you’d have to save it to a field like ColorEffect: TEffectNode and then later do ColorEffect.Enabled := true / false.

Thanks.
I now have this for testing but there is no lighting up when mouse is over the character (scene1). I also don’t see it in the design. What do I do wrong here?

Rescue_Island.zip (70.6 MB)

@michalis

So a reminder? Here it is. :slight_smile:

Thanks for the reproduction!

Testing:

  • Your model is correctly “lighten up”. So ViewMain.LightupColor correctly executes.

  • But then, it is never brought back to the default lighting. Because you compare Viewport.TransformUnderMouse <> nil, so whenever mouse is over anything (not necessarily your character), the model is lit up.

So you never see any change, because the EffectColorField.Send(Vector3(1, 1, 1)); from TViewMain.Update never executes. The color is always (1.3,1.3,1.3).

As a simple test to confirm this, I propose to change NewColor in TViewMain.LightupColor implementation to something drastically different, like saturated red, NewColor := Vector3(1, 0, 0);. When you do this, you will notice that character turns red immediately when you move the mouse, and just stays red all the time.

Solution: to make a “highlight”, what you want is to compare Viewport.TransformUnderMouse with your character, so

if Viewport.TransformUnderMouse <> nil then

→

if Viewport.TransformUnderMouse = Scene1 then

P.S. (Notes not directly related to your problem, but just mentioning in case they are useful):

  • Note that the Sender in procedure TViewMain.LightupColor(Sender: TObject) is not used. At least in this testcase – I realize that you probably cut it down before sending to me, so maybe you want to ignore this note, I just mention it in case it will be helpful.

  • You don’t need to run it as ViewMain.LightupColor(Scene1); (through the instance variable), you can just call it as LightupColor(...); when you’re already within another method TViewMain.Update.

All in all, in this simple testcase, I would implement TViewMain.Update in more obvious way, without LightupColor helper:

procedure TViewMain.Update(const SecondsPassed: Single; var HandleInput: Boolean);
begin
  inherited;

  if Viewport.TransformUnderMouse <> nil then
    Label1.Caption := Viewport.TransformUnderMouse.Name
  else
    Label1.Caption := ' ';

  if Viewport.TransformUnderMouse = Scene1 then
    EffectColorField.Send(Vector3(1.3, 1.3, 1.3))
  else
    EffectColorField.Send(Vector3(1, 1, 1));
end;

Note that I completely separated setting Label1.Caption from setting EffectColorField. They are independent, need different conditions.