Question about implementing shader-based sky in TCastleBackground

Hi. I’m trying to implement shader-based procedural clouds. I have the shaders just not sure how to implement them in CGE’s background. The default TCastleBackground only lets me assign “physical” textures, the properties are just text with a path to the file. Can I anyhow attach a shader, or at least TDrawableImage? I understand that TAbstract3DBackgroundNode lets me select Top/Bottom/… textures (TAbstractTextureNode) but it’s a long way.

On your presentation video Background (skybox, sky and ground) | Manual | Castle Game Engine I’ve seen we can make the background transparent and place a TCastleImage. If the TCastleBackground has no support for shaders, should I go this way (for example using TDrawableImage)? Or maybe there’s some other option that I didn’t see.

Similar problem I have with fog, where I can’t see a simple way to attach my shader either. The fog changes density with height, and color is affected by the Sun.

I’ve bunched the background and fog together here, because if there’s an option to use shaders in one, then maybe it’s doable for both.

I made mesh based procedural clouds in my earlier prototype. They were pretty light and really made the terrain look better with the shadows. I dont think the sky is geometry like a skybox, so maybe no go for shader. You could make your own skybox to work with shader? (the clouds here are a top mesh and a bottom mesh that extend across the sky. It then updates from some sin/cos and randomness and drops triangles from the index (TIndexedTriangleSetNode) where the top is lower than the bottom. So creates a realistic growing and shrinking as the clouds ‘move’ (the object never really moves).


I think cge fog is similarly simple, just adjusting the color by the length of the ray. I am not sure how you would accomplish dynamic 3d fog. maybe a plane or mesh that is in front and attached to your camera that dynamically changes transparency from what you compute it should be with a sample set of camera rays through it? Or billboarded transparent faces where there is fog? But that might have sort issues like my trees had? If you took your tree test app and used very transparent ‘fog puff’ images… you might find a pretty decent fog right there.

1 Like

Here is Workers&Resources (the only game I play anymore that I want to emulate with a dynamic world) with their beautiful clouds. They are using something like ‘fog puff’ billboards in 3d… and then in the background sky they have other cloud images. It looks fantastic. Fog is just clouds on the ground.

1 Like

Background:

The TCastleBackground is rendered as a regular geometry (just a textured cube, in the typical case when you just assigned 6 opaque textures) and can be adjusted using shaders.

I just added a new method TCastleBackground.SetEffects that allows to set shader effects on the background. This is our recommended (from today :slight_smile: ) way to set shader effects on the background.

The demo is in examples/viewport_and_scenes/shader_effects_on_background/ , showing

  1. an animated effect changing color,
  2. noise effect,
  3. both these effects at the same time.

Details and internals:

The key was that TAbstractBackgroundNode has

When using TCastleBackground, there’s a catch:

  • It doesn’t expose the TAbstractBackgroundNode instance. You could create your own TAbstractBackgroundNode and set it as TCastleViewport.MainScene, but I don’t advise it either, as TCastleViewport.MainScene is deprecated and I don’t want to “resurrect” it (it was a bad idea to designate some scene “central”).

  • And the planned material components will allow to expose materials on TCastleBackground in a comfortable way (and this will include ability to set shader effects in a comfortable way), but we’re not there yet.

  • What to do? Hm, I just exposed TCastleBackground.SetEffects to make it easy to just assign effects on TCastleBackground.

I have just committed it to the master branch of GitHub. As always, give a few hours for CI to make this available in downloads. When this page will no longer show commit titled “Implement and demonstrate TCastleBackground.SetEffects”, then it’s part of the downloads.

Note: I’m not saying that TCastleBackground.SetEffects is the best way to implement clouds etc.

  • I only literally answer your question “shaders on TCastleBackground”. As you can see in the demo, this is cool for some phychodelic effects… :slight_smile:

  • ..but using TCastleBackground.SetEffects to render clouds (prety realistic clouds as shown by @edj ) would not be my first choice. Because on skybox, you don’t get any new geometry, we still only render textured cube for a skybox. You can likely make your life easier by instead using some geometry for clouds and on that geometry using a volumetric fog effect. See Shader Effects (Compositing Shaders) | Castle Game Engine , as one of the demos it shows volumetric fog, you could apply the same principle to sample a 3D cloud volume.

Fog:

It’s a different answer, because the standard fog (from TCastleFog) is not actually something that is “rendered” by some specific shapes. Instead, every shape on the scene is rendered with the fog effect applied.

So to customize the fog, use shader effects, just apply them on all scenes in your viewport. You can implement “simple, classic” fog like blending with a color based on distance or something more fancy like volumetric fog sampling a 3D noise – see above for links how to use “shader effects”.

We have a dedicated plug for fog: PLUG_fog_apply, see A.2. Fragment shader plugs . But basically, mixing the rendered pixel with the desired fog color in any way will do the job. The interesting task is how you want to calculate the fog.

3 Likes

@edj : Thanks a lot. I was considering clouds as geometry. I’ve seen them before in one of your previous posts, probably a year old one and they look promising. However, it’s probably an overkill for my case… probably. It’s tempting and I will definitely compare it with other methods.

I’ll check the new SetEffects. I’m very glad that you answered to it so fast @michalis :slight_smile: And the solution may answer my needs well enough.

My fog is greatly affected by Inigo Quilez’ fog. His algorithms are nice and he obviously put some thought into them. It’s rather simple in theory. You just check the height above sea-level, do hundred of other calculations, and done. I will see what can be done, but the fancy fog is just an addition while the clouds are a “must have” priority - there’s no outdoor without clouds :slight_smile: Thanks again!

2 Likes

Finally I’ve got them to work.
Apparently void PLUG_fragment_modify(inout vec4 fragment_color) doesn’t pass fragment coords (or at least I have no idea how), so I had to replace it with

void PLUG_texture_color(
  inout vec4 texture_color,
  const in sampler2D texture,
  const in vec4 tex_coord)

It does work, however on the picture below you can see that there are visible seams between the skybox textures. Is there any option to turn the textures without complete rewriting of the CGE class?

Edit:
If the texture could be (optionally) loaded as a single image, it’d be much easier - otherwise shader doesn’t know which part (fron, back, etc) is rendered.
Image source Cube mapping - Wikipedia

As a side note, in the castleinternalbackgroundrenderer.pas lines 675 to 677 you do

  RenderSky;
  RenderGround;
  RenderCubeSides;

However, when you have all textures set (and not transparent), then neither Sky nor Ground needs to be rendered.

  • When one of side textures are missing then you need both Sky & Ground.
  • When Top only texture is missing, then you need only Sky.
  • And (most common in 3d world, where you can walk) when the Bottom texture is missing you may require the Ground to be rendered, but if the ground is covered by terrain mesh, then it could be optional (ie. left to programmer to decide).

I think instead of “fragment coords” you mean “texture coords”. The PLUG_fragment_modify indeed doesn’t get them, because it’s not necessarily on textured shapes (and shapes may also have multiple textures).

See the example I made examples/viewport_and_scenes/shader_effects_on_background, I somewhat anticipated this question and shown there how to solve it :slight_smile: Namely: you can declare castle_TexCoord0 like in castle-engine/examples/viewport_and_scenes/shader_effects_on_background/data/shaders/skybox_noise.fs at master · castle-engine/castle-engine · GitHub .

Using PLUG_texture_color here is not supported. As docs on A.2. Fragment shader plugs say, "This plug is available for texture effects. ". It works in this case kind of by accident, from what I can tell. Eg. it is undefined to which texture it applies (shapes in general may have multiple textures, and we don’t guarantee will it apply to first or all textures).

We expect you provide the skybox textures already rotated correctly, this makes it easy to support.

Unless you use shader to sample your own texture, then you can naturally rotate yourself the coords.

I agree, it’s a TODO for TCastleBackground.

We already support cubemaps in other contexts ( Cube map environmental texturing component | Castle Game Engine ), I have a TODO to support them also in Background.

We have such optimizations implemented for the X3D Background node handling, see demo-models/background at master · castle-engine/demo-models · GitHub . The RenderSky and RenderGround do nothing in certain situations.

That said, I didn’t try hard to expose them when using through TCastleBackground. Because 3.4. Optimize smartly: profile, optimize where it matters (and not where it doesn’t), think about smarter algorithms and moving CPU work to GPU to get big benefits . Making code more complicated only to avoid rendering sky/ground mesh is likely not a noticeable gain in any real application :slight_smile: If anything, I would introduce a trivial boolean property RenderSkyGroundSpheres to just hide them both (regardless of other conditions) if someone wants to avoid that 1 draw call (both sky and ground go to 1 mesh, deliberately).

castle_TexCoord0 didn’t work, hence my try with PLUG_texture_color. Apparently I only needed to change the scale (a parameter inside the shader), now it works fine. You provoked my thinking :slight_smile:

It worked on textures because they’re textures with phong shading :slight_smile: When I set url’s to an empty string (e.g. for Bottom) it didn’t raise any complains and - as expected - the area wasn’t rendered. It surprised me though, because Note that this "plug" exists only when using *Phong shading*, not *Gouraud shading*. Which means the background uses Phong? Thank you for clarifying that this was just a happy accident.

With 6 separate textures shader doesn’t communicate between them, so it’ll be very difficult to make the clouds move from A to B, I guess. Probably the mentioned environmental experimental cubes can lead my way for time being. The changes you’ve made in TCastleBackground to make shaders possible are very useful already, and they helped me a lot. Thanks!

Oh, I see you interpret the documentation text on A.2. Fragment shader plugs wrong – which means it’s my fault, the documentation formatting is misleading.

The text on A.2. Fragment shader plugs applies to the PLUG_xxx defined above.

So the sentence " Note that this “plug” exists only when using Phong shading, not Gouraud shading." applies to the PLUG_fragment_eye_space, described above. Not to the PLUG_texture_color which is defined below.

I can see how this is the fault of formatting… The margins around are misleading. This is TODO for me, improve this docs. Actually, it would be best to just rework this entire documentation ( Compositing Shaders in X3D , DocBook sources are in GitHub cge-documentation ) into nice AsciiDoctor pages that are better integrated with our website. Making them simpler along the way is also necessary – right now it’s maybe too much “like a book”, it should be more “webpages that teach you simple things and stand on their own”.

No, the background rendering uses “unlit” lighting equation, so it ignores lighting. TBackground3D in src/scene/castleinternalbackgroundrenderer.pas doesn’t create any TXxxMaterialNode instance, which means that that TApperanceNode behaves as if it uses white unlit (like TUnlitMaterialNode) node.

Hmmm, thinking about it – I don’t think you don’t need to wait for extension of TCastleBackground for cubemaps. You can get the 3D direction in a current shader. And then you can use this direction – to sample cubemaps, or to do any other fancy computations :slight_smile:

OK, I started doing it, but need to run for today to another task. Basically background shaders can get camera matrices ( Navigation component - extensions | Castle Game Engine ) and then you can calculate 3D direction in background shader. I will try to finish this over the weekend and let here know! It should be simple modification to TCastleBackground implementation.

( I also considered advising to “make a skybox manually, without relying on TCastleBackground or TXxxBackgroundNode from CGE” – which is possible, you could have a background TCastleViewport which literal cube mesh surrounding the player position. It’s possible, but forget about it – it will not be necessary if I just extend TCastleBackground. )

2 Likes

Just noting here a fix to my previous answer version: I should have said “unlit lighting equation”, not “unlit shading”. “Shading” a bit different term and it’s easy to confuse “Phong shading” with “Phong lighting equation”, to let me try to keep myself correct :slight_smile:

I plan to do also a small improvement to this, as I wasn’t happy with how Viewpoint.camera*Matrix are a bit unnatural to use. Instead I will add:

  • TEffectNode.ShaderLibraries, list of strings, which can be set like MyEffectNode.SetShaderLibraries(['castle-shader:/EyeWorldSpace.glsl']) to add CGE camera functions. (Later: edited this sentence to correspond to what was actually implemented, to not confuse readers)

  • The CastleEngine/Camera.glsl will define functions for shader, and also make sure the engine passes uniforms they need:

     vec4 position_world_to_eye_space(vec4 position_world)
     vec4 position_eye_to_world_space(vec4 position_eye)
     vec3 direction_eye_to_world_space(vec3 direction_eye)
     vec3 direction_world_to_eye_space(vec3 direction_world)
    

The above should be:

  • “extensible” (for the future, ShaderLibraries could be useful for more things; and exposing GLSL functions allows to possibly change their implementation without breaking compat).

  • And easy to use – GLSL functions look more obvious than a uniform like cameraRotationInverseMatrix (even though the point is the same; direction_eye_to_world_space is really just cameraRotationInverseMatrix * direction_eye).

Still planned to do over the weekend :slight_smile:

2 Likes

Implemented :slight_smile:

That is, we have a new way to access in shader code useful utilities

vec4 position_world_to_eye_space(vec4 position_world);
vec4 position_eye_to_world_space(vec4 position_eye);

vec3 direction_world_to_eye_space(vec3 direction_world);
vec3 direction_eye_to_world_space(vec3 direction_eye);

and in effect you can get direction from camera to the point you’re rendering, in world space, in any shader (like the one attached using TCastleBackground.SetEffects) and … do anything with this direction. Like query a cubemap (defined from 6 separate files, or a file format like DDS).

As usual, this was just committed to CGE master branch, and will be soon available in our downloads. You can observer this page, when it will no longer show commit “Support TEffectNode.SetShaderLibraries” then it is part of the downloads.

Below is a preliminary news (to post on Castle Game Engine – Open-Source 3D and 2D Game Engine one weekend) with details about this feature:


“Shader libraries” to enhance your shader effects in the future, for now: to get extra 4 GLSL functions to convert world<->eye space

We have added a new way to add additional functionality to your shaders, as defined using shader effects (our recommended way to write shader code in Castle Game Engine).

The Effect node ([cgeref id=TEffectNode] in Pascal) gets additional property shaderLibraries (string list). In Pascal you set it like this:

MyEffectNode.SetShaderLibraries(['castle-shader:/EyeWorldSpace.glsl']);

Right now, the castle-shader:/EyeWorldSpace.glsl is the only possible value you can put there. But the system may be more flexible in the future, allowing us to expose more GLSL libraries (from the engine, using castle-shader:/; other ideas may appear; note that you don’t need this to reuse shader setup in your own application, since you can just reuse own TEffectPartNode multiple times).

Each “shader library” may define additional GLSL functions. It can also use PLUG_xxx of the shader, thus augmenting the rendering or computation. The uniform values necessary for the library are automatically passed by the engine, so you don’t need to know/do anything more to use it.

The castle-shader:/EyeWorldSpace.glsl, in particular, defines 4 new GLSL functions, available in both fragment and vertex stages:

vec4 position_world_to_eye_space(vec4 position_world);
vec4 position_eye_to_world_space(vec4 position_eye);

vec3 direction_world_to_eye_space(vec3 direction_world);
vec3 direction_eye_to_world_space(vec3 direction_eye);

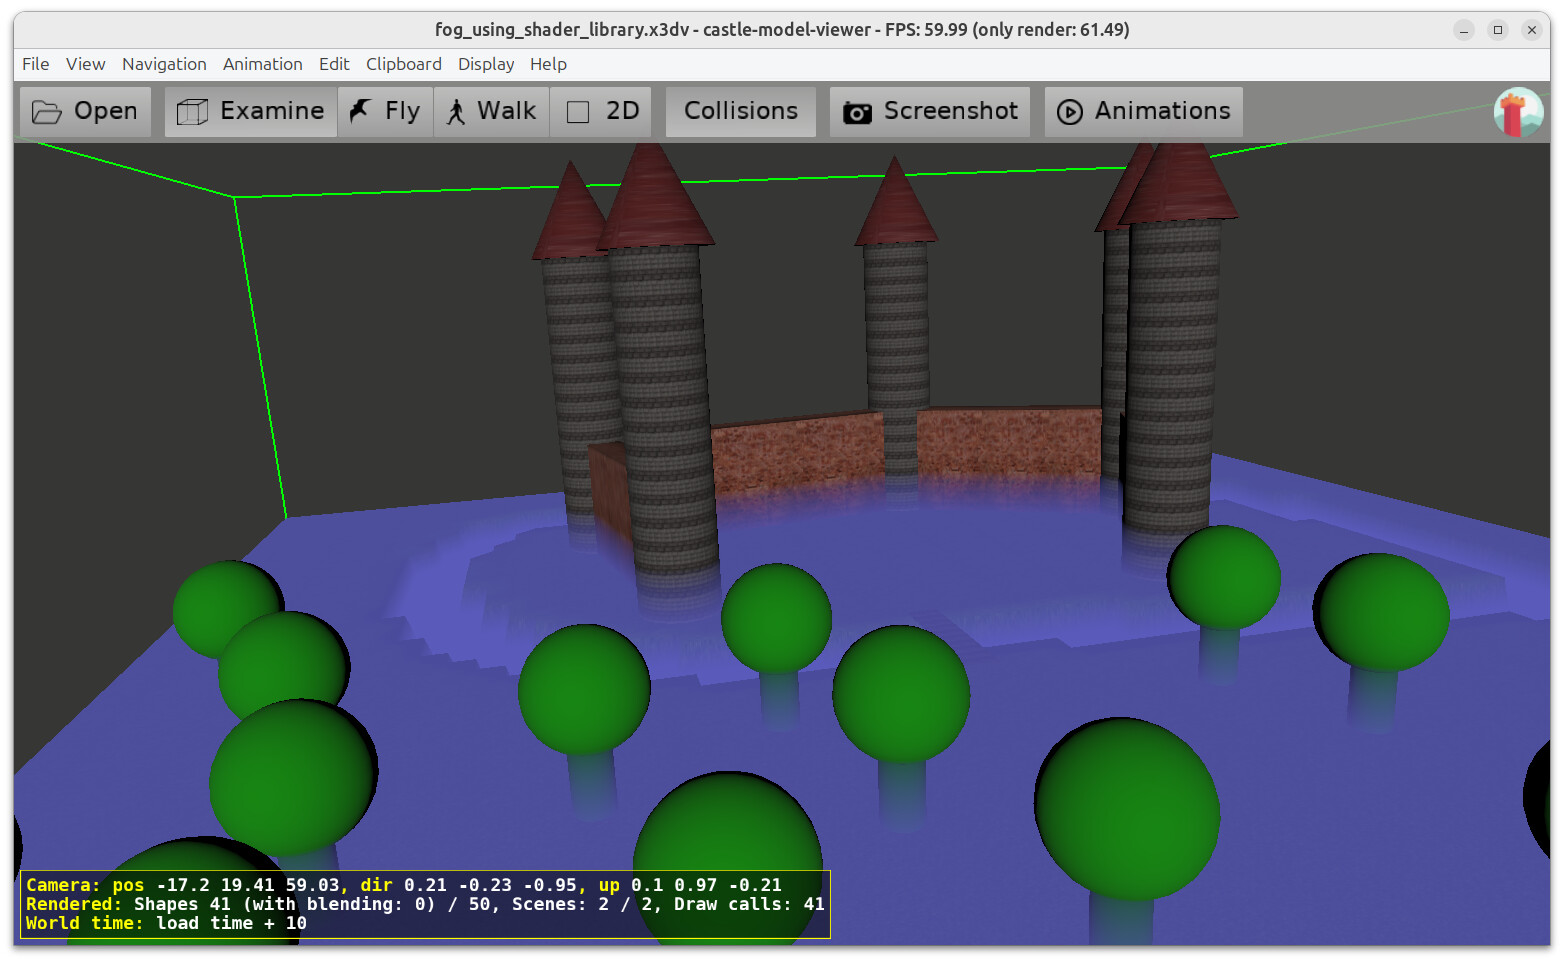
Use them in your own shader code in your own EffectPart nodes. Just make “forward declaration” for them first, like this (effect makes fog depending on point height in world space):

vec4 position_eye_to_world_space(vec4 position_eye);

// Save value obtained in PLUG_fragment_eye_space to use in PLUG_fragment_modify.
vec4 vertex_world;

// Get the vertex position in world space.
void PLUG_fragment_eye_space(
  const vec4 vertex_eye,
  inout vec3 normal_eye)
{
  vertex_world = position_eye_to_world_space(vertex_eye);
}

// Make lower things enveloped in fog (turn into gray).
void PLUG_fragment_modify(
  inout vec4 fragment_color)
{
  const float fog_y_start = 0.5;
  const float fog_y_max = -5.0;

  if (vertex_world.y < fog_y_start) {
    const vec4 bottom_fog_color = vec4(0.1, 0.1, 0.5, 1);
    float factor = max(0.0,
      (vertex_world.y - fog_y_max) /
      (fog_y_start - fog_y_max));
    fragment_color = mix(bottom_fog_color, fragment_color, factor);
  }
}

The X3D file demonstrating this feature is in demo-models/compositing_shaders/fog_using_shader_library.x3dv at master · castle-engine/demo-models · GitHub

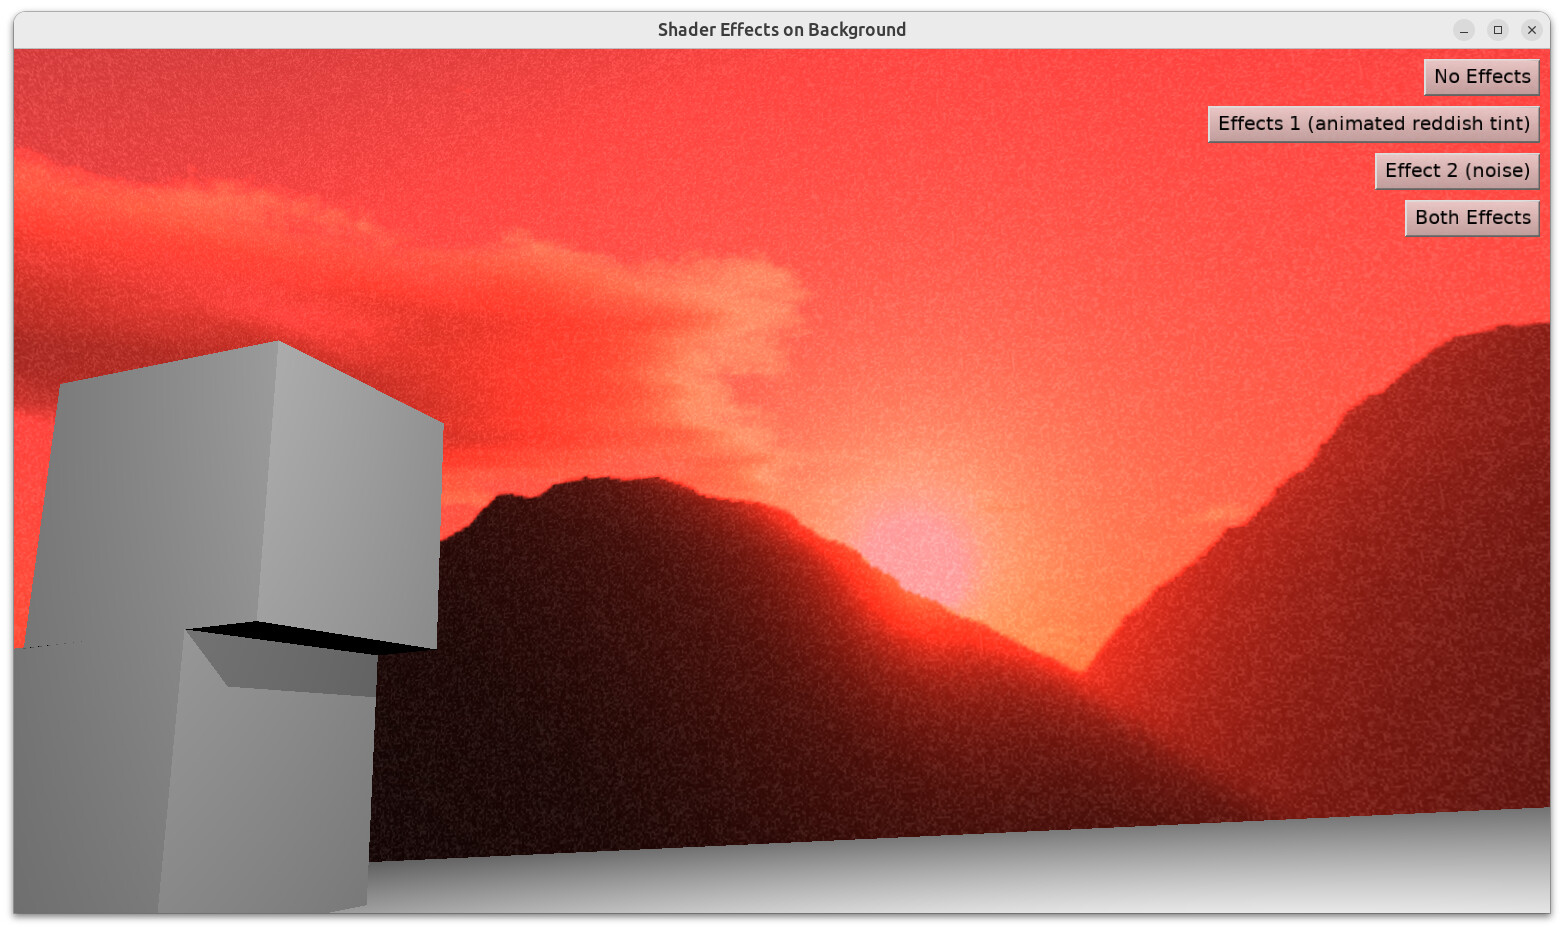
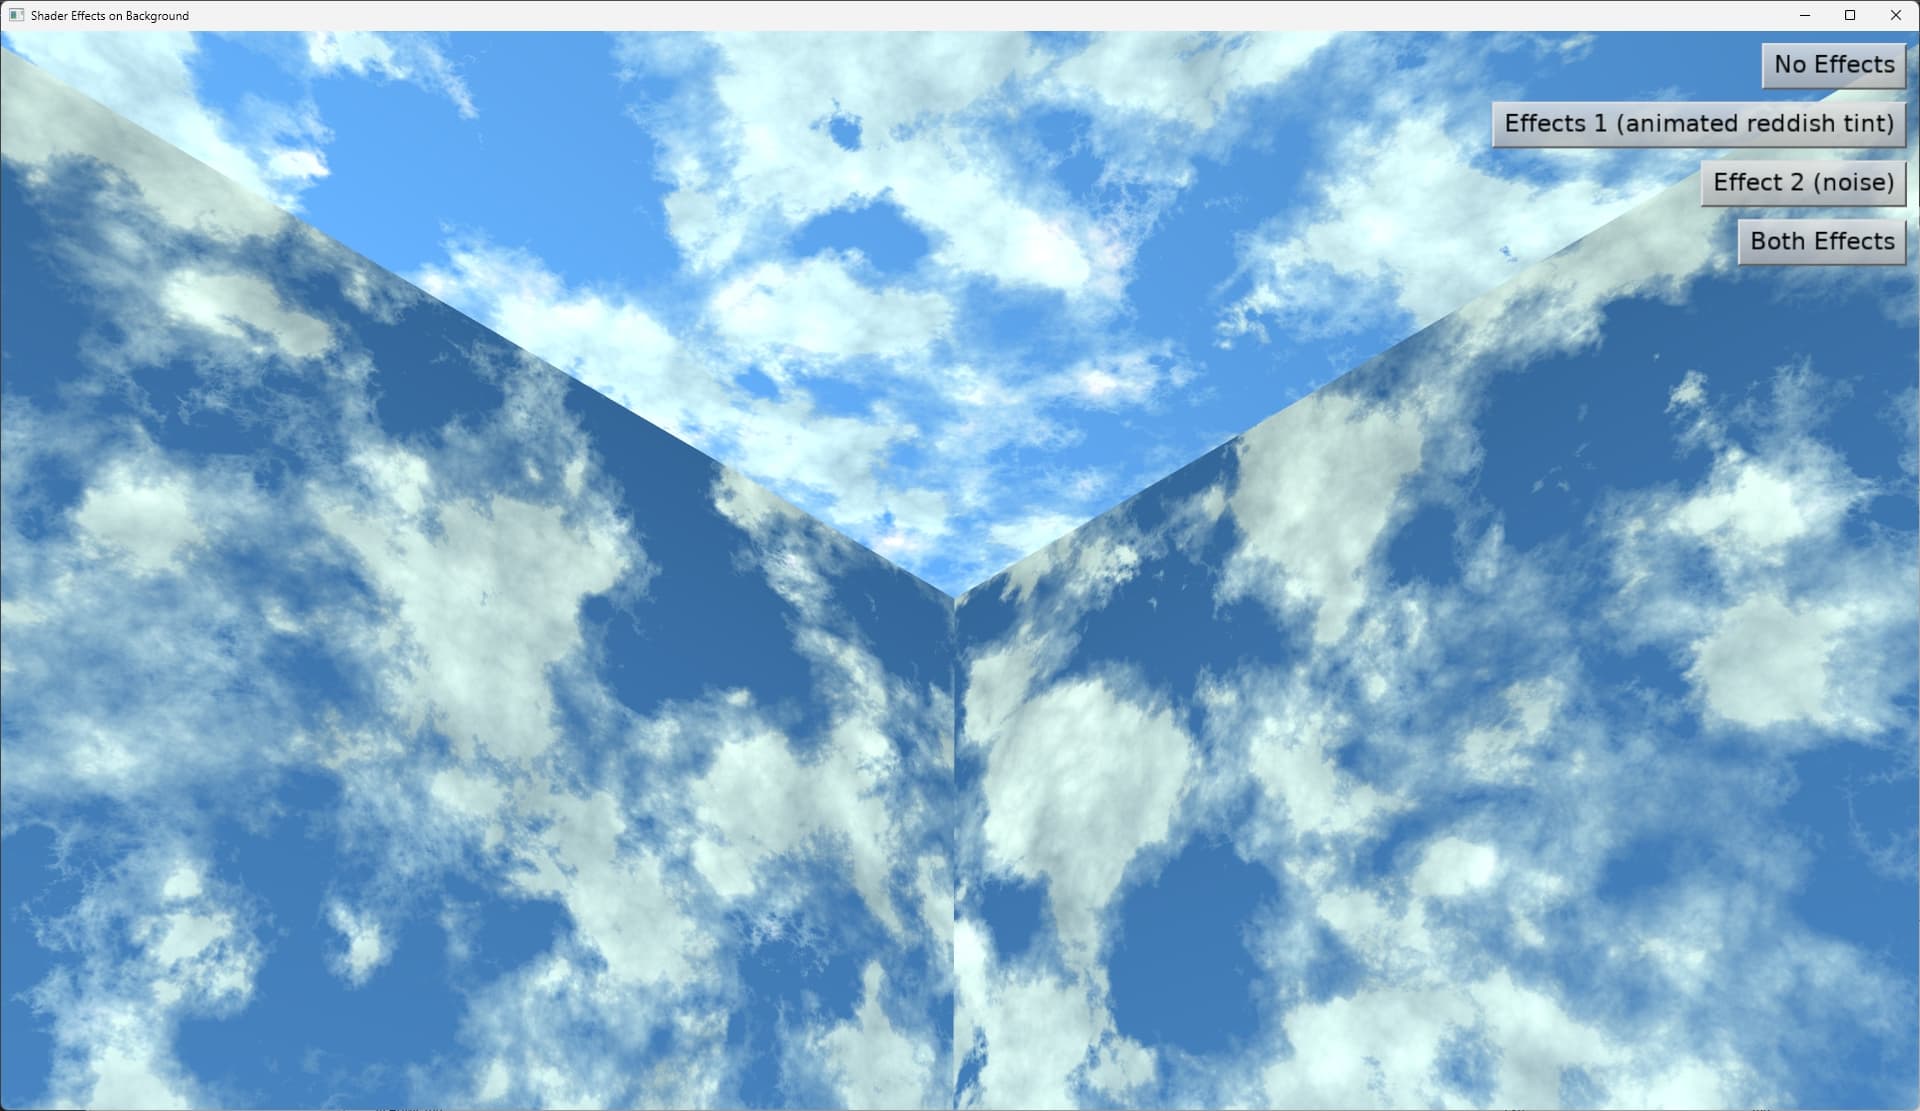
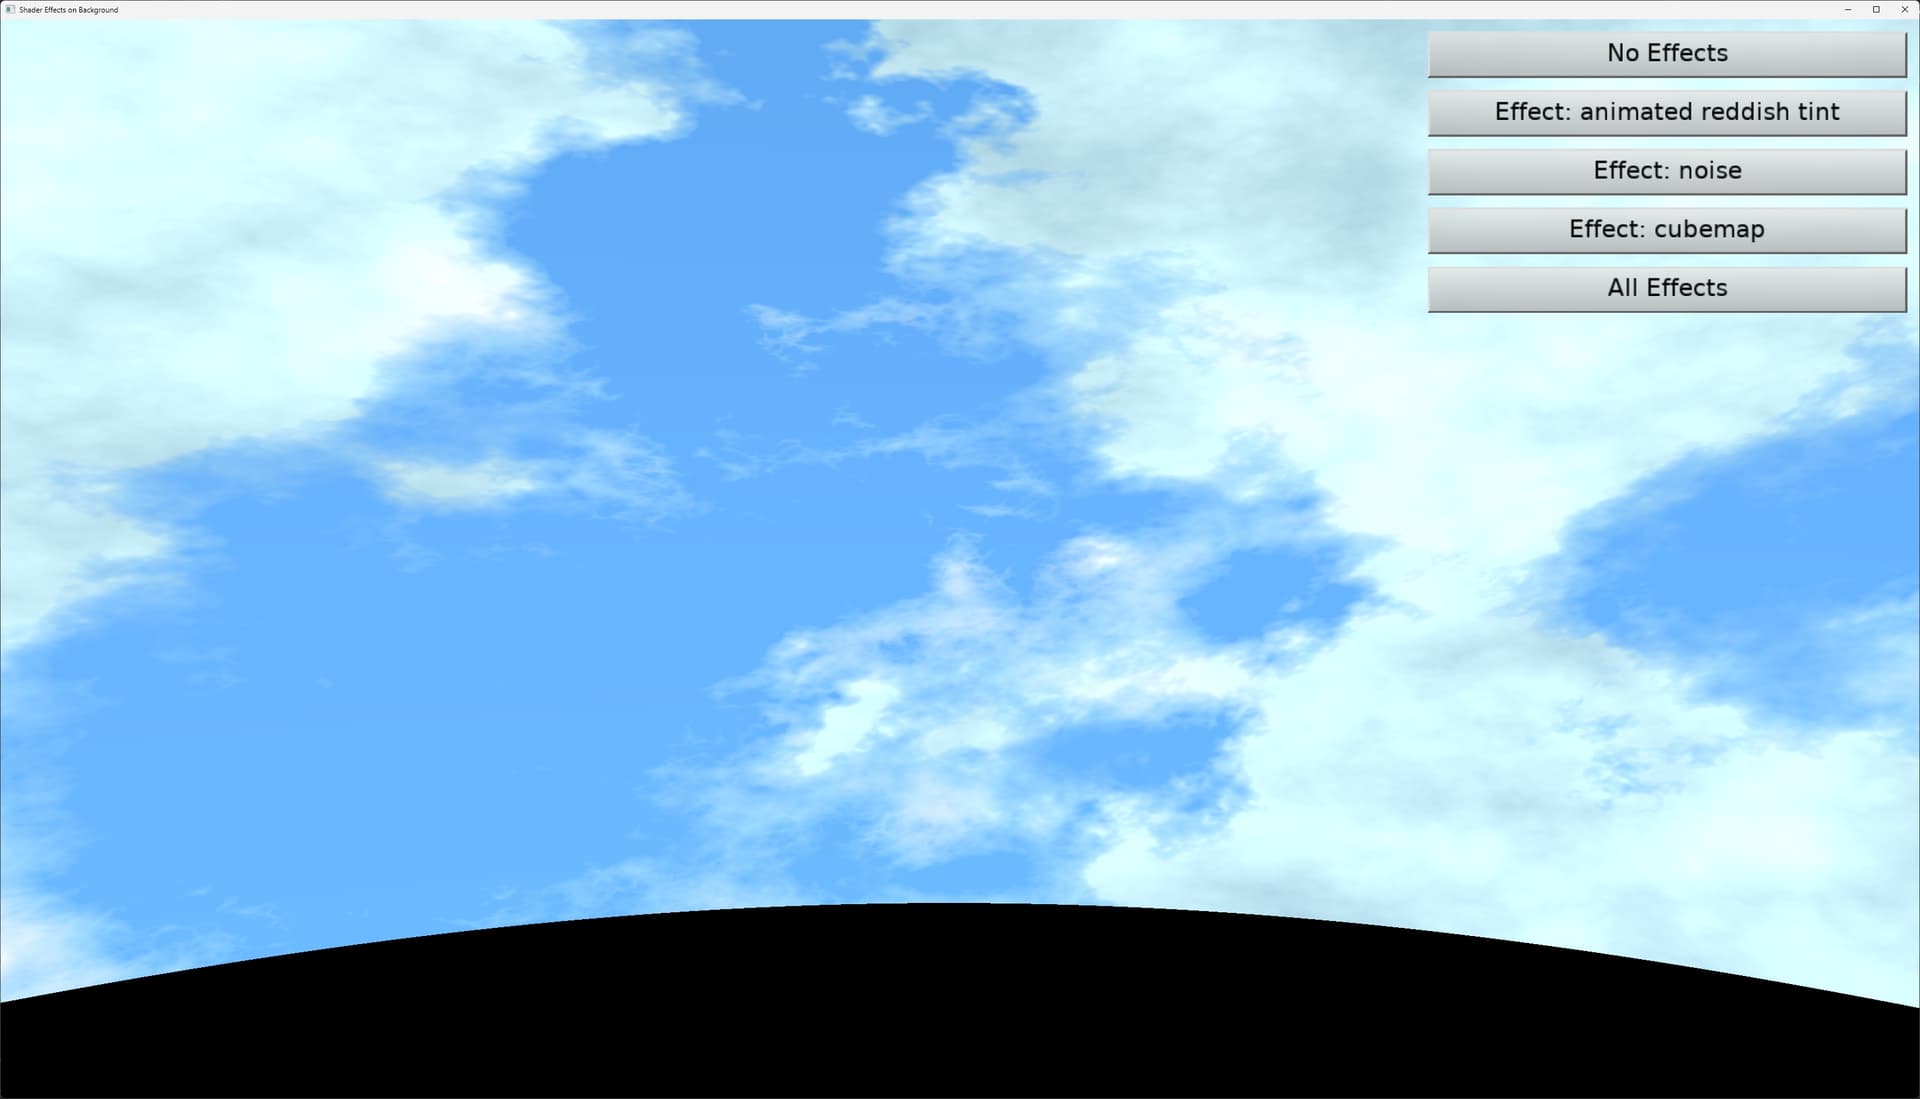
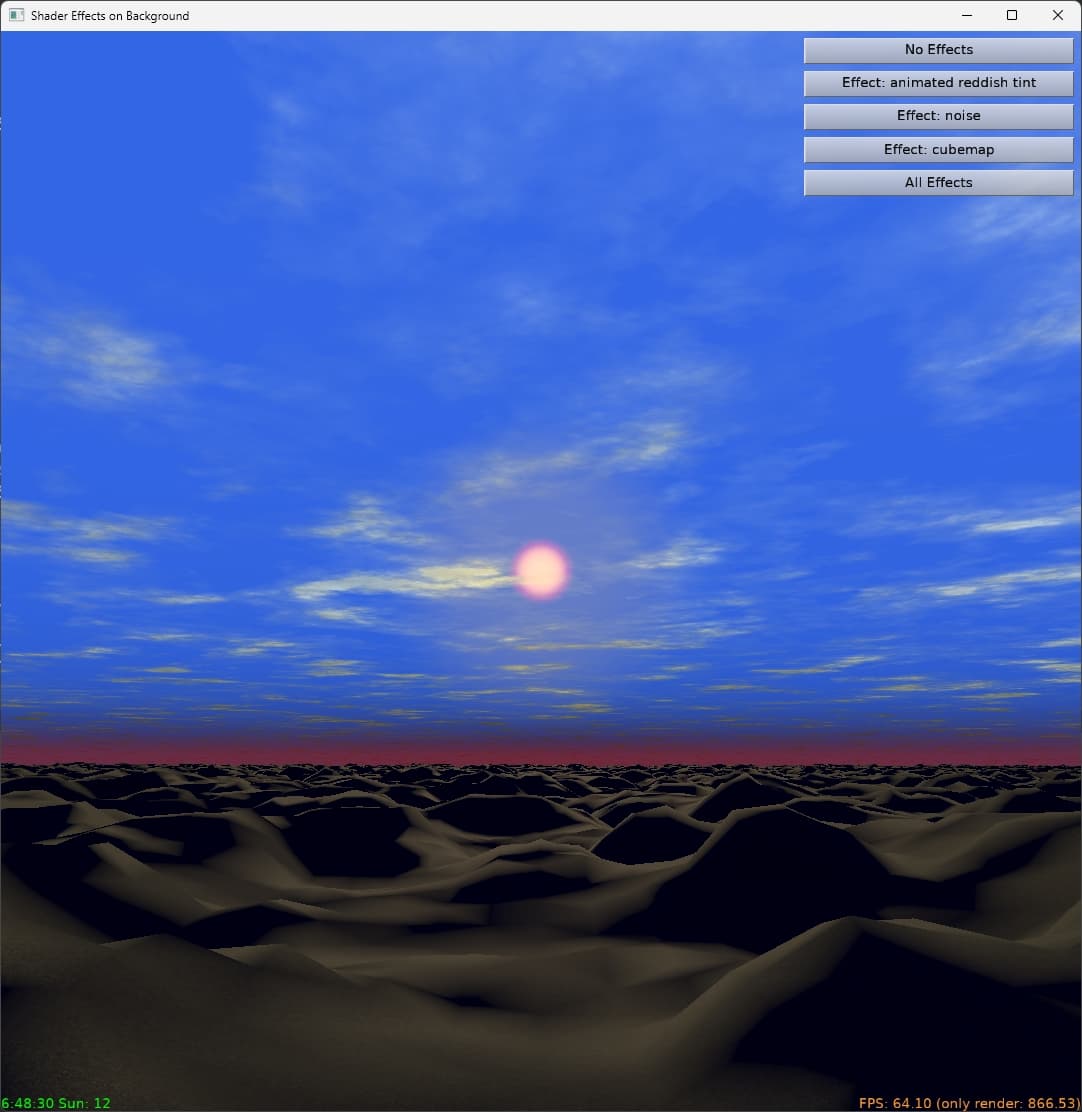
The Pascal example demonstrating this feature is in castle-engine/examples/viewport_and_scenes/shader_effects_on_background at master · castle-engine/castle-engine · GitHub . The “Effect: cube map” is using this to get 3D direction from camera to rendered point, in world space, and then use this direction to query a cubemap (loaded from DDS).

This deprecates: our Viewpoint.camera*Matrix events. Their usage in practice was only to pass new uniforms to the shaders, but they were complicated to use, needed X3D Viewpoint node, routes, passing events… The new thing is trivial to setup if you already have code dealing with shaders using TEffectPartNode, in Pascal or in X3D. And it is trivial to implement too, it just does literally what you expect, i.e. adds extra GLSL code and makes sure it receives proper input (uniforms).

3 Likes

That’s a great news, and a big step. Also it’s nice you’ve made the fog - it’s more realistic than a simple static stuff (eg. mountain tops receive less fog, like in life) and I’m sure people who want to make a game with beautiful landscapes will surely benefit from it.

Now, I’ll check the clouds generation. Happy errors time for me :slight_smile:

1 Like

OK, my mind was processing the new TCastleBackground.SetEffects and how much I like the simplicity of it, and also how our current docs of shaders were too complicated and not clearly recommending “this is how you use shaders from Pascal”.

I did a big improvement over above today:

  • Added new methods TCastleScene.SetEffects, TCastleAbstractPrimitive.SetEffects, TCastleImageTransform.SetEffects. So, we have Xxx.SetEffects on all important components now and this is now our recommended approach to use shaders, as it associates the TEffectNode/TEffectPartNode (which I was already recommending) with the higher-level components that are “core” of our engine (like TCastleScene) is the simplest possible way.

  • I wrote a big new page Shaders | Manual | Castle Game Engine that explains how to create TEffectNode, TEffectPartNode, and use them with Xxx.SetEffects. This attempts to explain the simple and recommended approach for using shaders throughout CGE.

    • It starts with up-to-date explanation of why we like “shader effects” so much.
    • Goes through simple examples: the most trivial shader, pass time, pass texture.
    • Points interested readers to all the “advanced” topics and alternative ways to use shaders (sometimes more complicated).
  • I also improved examples, along with all links to them from old and new docs:

    • moved few examples to examples/shaders/
    • added shader_effects_simple example (which corresponds to the code we create in a tutorial-like sections of Shaders | Manual | Castle Game Engine ).
    • added shader_effects_on_primitives (simple test of SetEffects on primitives and TCastleImageTransform).

OK, I really like it, I feel that this “plugs” an important part of the engine :slight_smile: Our “shader effects” got the documentation and ease of use they deserved.


4 Likes

Thanks to the vertex_dir_world my clouds got a spherical projection onto the cubemap (I’m not using the *.dds, just basic cubemap).

  // world.zxy vs xyz makes the pole either on X or Y axis
  // the animation will evolve around that axis
  // vec3 vertex_dir_for_cubemap = normalize(vertex_dir_world.zxy);
  vec3 vertex_dir_for_cubemap = normalize(vertex_dir_world.xyz);

  // 0.5-0.5*  if I want x and y [0..1]. Otherwise it's [-1..1]
  // vec3 sphereUV = vec3( asin(0.5 + 0.5*vertex_dir_for_cubemap.y*1.000) / halfPI, 0.5+0.5*atan(vertex_dir_for_cubemap.x, vertex_dir_for_cubemap.z) / TAU, 1 );
  vec3 sphereUV = vec3( asin(vertex_dir_for_cubemap.y*1.000) / halfPI, atan(vertex_dir_for_cubemap.x, vertex_dir_for_cubemap.z) / TAU, 1 );

I cut the bottom at x <= -0.2 to avoid rendering things that can’t be seen from the ground (visible on the picture below).
Rest of the shader can be basically any shader, just instead of texture coords, the sphereUV should be used. It’s possible to paint the Sun or stars basing on Latitude and Longitude (sphereUV.x & y). Hope that helps those interested in the topic :slight_smile:

Again, big, big thank you @michalis This update has many interesting implementations.

2 Likes

That looks really good!

The shader I consider mostly done. It displays the Sun synced with TCastleDirectionalLight. Color of the in-game light is calculated from the Sun color temperature, so it gets the natural orange / red tint at sunrise / sunset. Also the horizon changes its color dynamically, and Sun disk gets smaller the higher it goes.

Shader is very fast, even though CGE refresh rate is never at the monitor’s freq.

// Description for those who are interested in the solution

Although there are functions to calc the RGB from temperature, definitely most of them are using How to Convert Temperature (K) to RGB: Algorithm and Sample Code | tannerhelland.com with logarithms, even if giving credits hurts :wink: However, for the range below 6000K (Kelvin) it’s less accurate. And for game or technical visualization most of light sources (light bulb, candle, fire) falls below that value.

As an alternative you could calculate chromaticity and then RGB, easy. But to be frank, the best way is just to use a lookup table, and if necessary interpolate.
You can find table from Mitchell Charity as your best friend. It gives values for 2deg & 10deg. For those unsure what’s that, pick 2 boss. The temperatures in the table are at 100 interval.

The clouds are generated using much modified shader from person called Drift, at ShaderToy - 2D Clouds, but any shader would do.

I initially experimented with projecting the clouds on a virtual sphere, as mentioned before. However the horizon wasn’t too realistic. So I decided that flat plane is best solution.

void PLUG_fragment_modify(inout vec4 fragment_color)
{
  vec3 vertex_dir_for_cubemap = normalize(vertex_dir_world.zxy);
  vec2 planeUV = (vertex_dir_for_cubemap.xy * 0.1) / (abs(vertex_dir_for_cubemap.z)+.01);
// and then use the planeUV.x / planeUV.y as coords for calculations

The horizon is basically just a gradient. The horizon color, sky base color, Sun color & direction come from Update function inside pascal.

Example code:

    sunAngle := (Hour + Minute/60 + Second/3600) * 15 - 90;
    Theta := Deg(sunAngle);
    Phi := Deg(0);
    sZ := Cos(Theta)*Cos(Phi);
    sY := Sin(Theta)*Cos(Phi);
    sX := -Sin(Phi);
    TheSun.Direction := Vector3(sX, sY, sZ);
    EffectSunDirection.Send(TheSun.Direction);

I find this method easier than built-in .Rotation

I know it’s not an exhaustive explanation, but honestly best results come from experimenting :slight_smile: I’ve seen this sunset over a thousand times in last few days :rofl: I don’t need summer holiday anymore!

And a video… not the best quality though.

4 Likes

You are making my revisiting of sun movement too easy! Good work.